Heating Oil Tank Safety Check
Raise your hand if you want to spend money on a new heating oil tank! Nope—no takers? We get it – replacing an oil tank is something no one wants to spend money on.
But while it’s not something anyone wants to think about, the reality is that a heating oil storage tank can deteriorate over time…and when that happens, it WILL need to be replaced. And the sooner the better because when an oil tank fails, the expense of cleaning an oil leak can range from – wait for it – $20,000 to $50,000. Not. A. Typo.
So, if you want to save yourself, well your entire savings, then take a few minutes to do a heating oil tank safety inspection because it can help you know when your tank has begun to deteriorate, and when it’s time to replace it.
9-point oil tank safety inspection
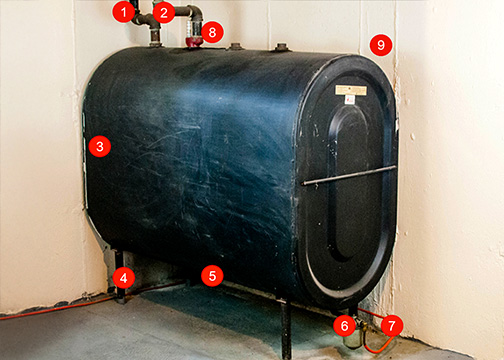
Okay, first things first. Let’s make sure your oil tank is in good shape. There are 9 points that you’ll need to check when performing an oil tank safety inspection. We’ll talk you through each of them. Begin by taking a look at the diagram below to see where things are located.

Point #1: The vent pipe
The vent pipe is located on the outside of your house next to your tank’s fill pipe. It’s there to relieve the vacuum created when your burner pulls oil from the oil tank. When your Heatable driver puts oil in your tank, the outgoing air goes through the end of the vent pipe and makes noise like a whistle. (If the driver doesn’t hear a whistle, he or she will immediately stop the delivery. Why? Because no whistle can mean the tank is full or the lines are clogged and there’s a risk of a spill. Always make sure the vent pipe’s not clogged or covered by snow, leaves, or other debris. If it is, it won’t work the way it should and that will put pressure on your oil tank.
Point #2: The fill pipe
The fill pipe is where your friendly Heatable driver delivers the heating oil you ordered to your oil tank. It’s like the hole under the gas cap in your car where you insert the gas nozzle, but in pipe form. It’s located next to the vent pipe and like the vent pipe, it’s important to keep it clear. It’s also important to check that no oil is leaking from it and that the pipe is made from a material like steel (note: it can’t be made out of PVC pipe…yes, we see that occasionally)
If there’s a leak, or you think there might be a leak, please call a heating service technician immediately, or give us a call at Heatable, and we’ll point you in the right direction.
Point #3: The tank surface
After you’ve looked at the vent and fill pipes, go to the oil tank itself. If it’s in a dark part of your basement, bring a flashlight because you’re going to want to see the surface of it. Make sure the surface is free from rust, oil “weeps”, wet spots, or excessive dents. Make sure you don’t run your hand on the surface, because you are likely to get a really dirty hand.
If there’s a leak, or you think there might be a leak, call a heating service technician immediately, or give us a call at Heatable, and we’ll point you in the right direction.
Point #4: The tank legs
The tank doesn’t (err, shouldn’t) sit on the ground. It has little legs that hold it up. Get down on your knees, shine the flashlight, and make sure the legs are stable, not overly rusty, and on an even foundation. The tank should never rock (or roll).
If there’s a leak, or you think there might be a leak—you know what to do. Call a heating service technician immediately, or give us a call at Heatable, and we’ll point you in the right direction.
Point #5: The tank underbelly
While you’re on your knees, take a look at the underside of the oil tank. Yup, you may need to lie down. Don’t want to? Remind yourself of the $20,000 to $50,000 clean-up cost. Make sure there are no leaks—or signs of leaks—under the tank. Just like the tank surface, don’t run your hand along the bottom of the tank.
If there’s a leak, or you think there might be a leak—you know what to do. Call a heating service technician immediately, or give us a call at Heatable, and we’ll point you in the right direction.
Point #6: The oil filter
Sit back and give yourself a pat on the back, because you’re doing great. While you’re still on the ground, take a look at the oil filter and make sure you don’t see any leaks or signs of leaks around it.
Can you guess what comes next? If there’s a leak, or you think there might be a leak—you know what to do. Call a heating service technician immediately, or give us a call at Heatable, and we’ll point you in the right direction.
Point #7: The oil line
Oil lines run from the oil tank to the burner. They usually run above the concrete and are encased in a protective tubing. Starting at the oil tank end of the line, follow the length of it to the burner looking for leaks or signs of leaks. If your line runs under the ground, you should call your heating service technician and ask them to replace it. Lines that run under the ground can leak without you ever knowing.
All together now— If there’s a leak, or you think there might be a leak—you know what to do. Call a heating service technician immediately, or give us a call at Heatable, and we’ll point you in the right direction.
Point #8: The oil gauge
Right-o, time to stand! Doesn’t that feel good? Find the oil gauge. It’s usually located on the top of your tank and tells you how much oil you have. You want to make sure it is working, so you’ll want to see where it measures and then check it again in a day or two when you know the system has been on. If the gauge is in the same spot, it may not be doing its job correctly.
Once again, if there’s a leak, or you think there might be a leak—you know what to do. Call a heating service technician immediately, or give us a call at Heatable, and we’ll point you in the right direction.
Point #9: The age of your oil tank
Never had a problem with your oil tank in the 25 years you’ve owned it? Awesome. Thank it for its good service and look into replacing it. Like we said, oil tanks deteriorate over time, so age is a factor. If you’ve just moved in, you’ll need to find out when the previous owners replaced it.
If you’re not sure, please call a heating service technician immediately, or give us a call at Heatable, and we’ll point you in the right direction.
The oil tank safety inspection checklist in brief
Now that you know the ins and outs of the inspection, here’s a list of the steps to keep handy. Feel free to print it out and hang it on the fridge with your S.O. to deal with.
-
Vent pipe: Located outside, make sure it’s not clogged with snow or other debris.
-
Fill pipe: Make sure it’s clear and there are no signs of leakage.
-
Tank surface: Look for rust, oil “weeps”, wet spots, or excessive dents.
-
Tank legs: Legs should be stable and on an even foundation.
-
Beneath the tank: Look for leaks or signs of leaks.
-
Oil filter: Look for leaks or signs of leaks under or around the oil filter.
-
Oil lines: Look for leaks or signs of leaks along the entire oil line.
-
Tank gauge: Check the gauge is working.
-
Age of tank: Confirm that your tank is less than 25 years old.
You can count on Heatable
If you complete the heating oil inspection and have found a leak, or are unsure if something looks wonky, please call a heating service technician immediately, or give us a call at Heatable, and we’ll point you in the right direction. We’re all about safety.